Introduction
RC Timing is an App that tracks lap times for cars. It can be used in indoor and outdoor tracks and it can be also used for slot racing. This App is not intended to replace your club’s timing system. It is thought to help you in situations where you want to practice and the local timing system is not available. RC Timing will use voice synthesizer during timing sessions so you can connect the iOS device to a bluetooth speaker and you will know about your last time, your opponent last time, your best personal time and the overall best time.
It uses the main (back) camera for tracking cars’ colors. It is quite important that you learn how to properly setup both the car and the track configuration in order to get good results. RC Timing internally works by firing a timer once a configured color is detected on the screen during timing sessions. So there are a couple of settings that must be configured to avoid as many errors as possible given the ambient luminosity changes and the fact that other cars may also affect the detection when running on track simultaneously.
RC Timing supports up to 10 simultaneously cars to be tracked during a timing session but those cars should have different body car colors. It is recommended that the body car painting not to be too much scattered with different colors/stickers. The best choice would be to have a unique color for the whole car but it also works great if the front or rear end of the car body has a unique color. IT IS IMPORTANT TO AVOID USING WHITE AS THE COLOR TO BE TRACKED: the reason for this is that lots of reflections contain white color and they make the sensors to lose accuracy. You can also stick a colored vinyl covering a big portion of the body car and use that color to be tracked.
All logged laps are stored and can be later seen per car profile and track so you can have a history of all tracked laps in a given track.
Main view presents three sections:
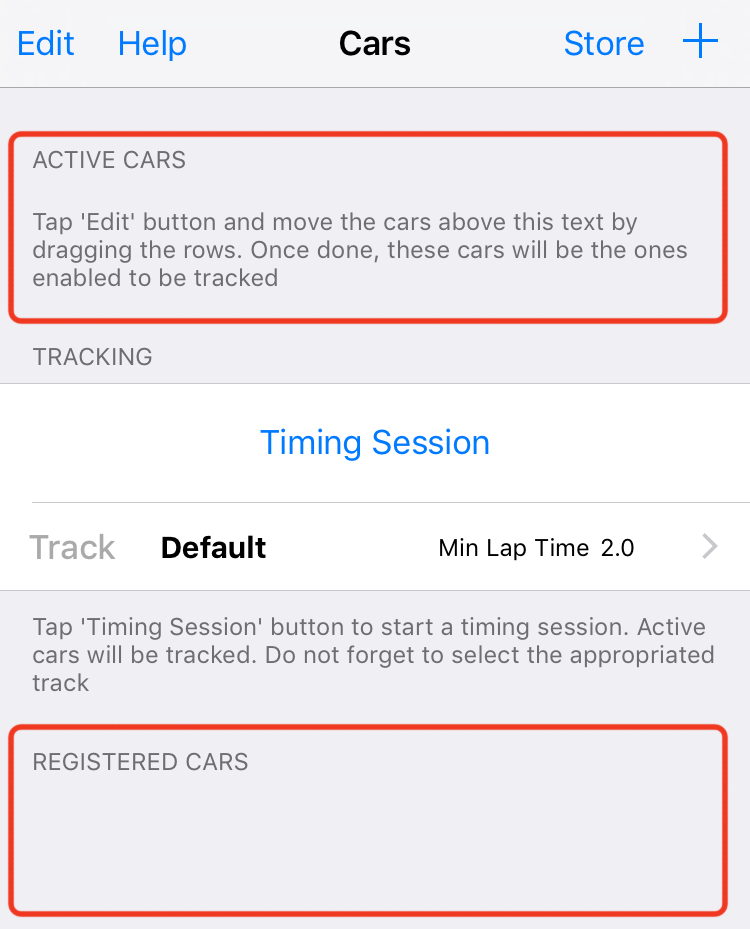
- ACTIVE CARS: Cars in this section will be active for the Timing Session so they will be tracked.
- TRACKING:
It lets you choose the track where you are racing on. Read on the section
How to configure a trackfor further instructions. - REGISTERED CARS: Cars in this section will contain the rest of registered cars in the App and they are not active for tracking.
Tapping the + button lets you create a car profile. A car profile is composed of a Driver name and a car name. The Driver name is used by the voice synthesizer to tell about the lap times during timing session so you should choose a proper name for that. Car name is only used for you to refer to the specific color and threshold settings for a given car. More on this in How to configure a car section.

Tapping in the Edit button lets you move cars between ACTIVE CARS and REGISTERED CARS sections. Note that it is only allowed to have 10 active cars if you have bought the unlock.
You can also see/edit the car configuration by tapping on the Car rows.

How to configure a Track
As described above, RC Timing works by tracking a color. There are situations where there are other cars with similar body car colors than your car. You can try to use another body car with a different color. You can stick a vinyl with a different color over the body car too. But RC Timing offers a setting that tries to avoid that similar colored car to affect your lap times. The setting is Min Lap Time and what it does is to not count for lap times below the number of seconds configured by that setting. So if your local track's best lap time is 17.2 seconds, you can configure that setting to be between 16.5 - 17.0 seconds. That would mean that once your car passes over the place where the iOS device is tracking the session it won’t be tracking that specific car until that number of seconds elapses. This is also important as it helps not draining your battery.
How to configure a Car
Once you have create a car profile and you have set the driver name and car name, it is time to go to the Configuration view. There you can setup the color to be tracked and a couple of settings that are used during the timing session.
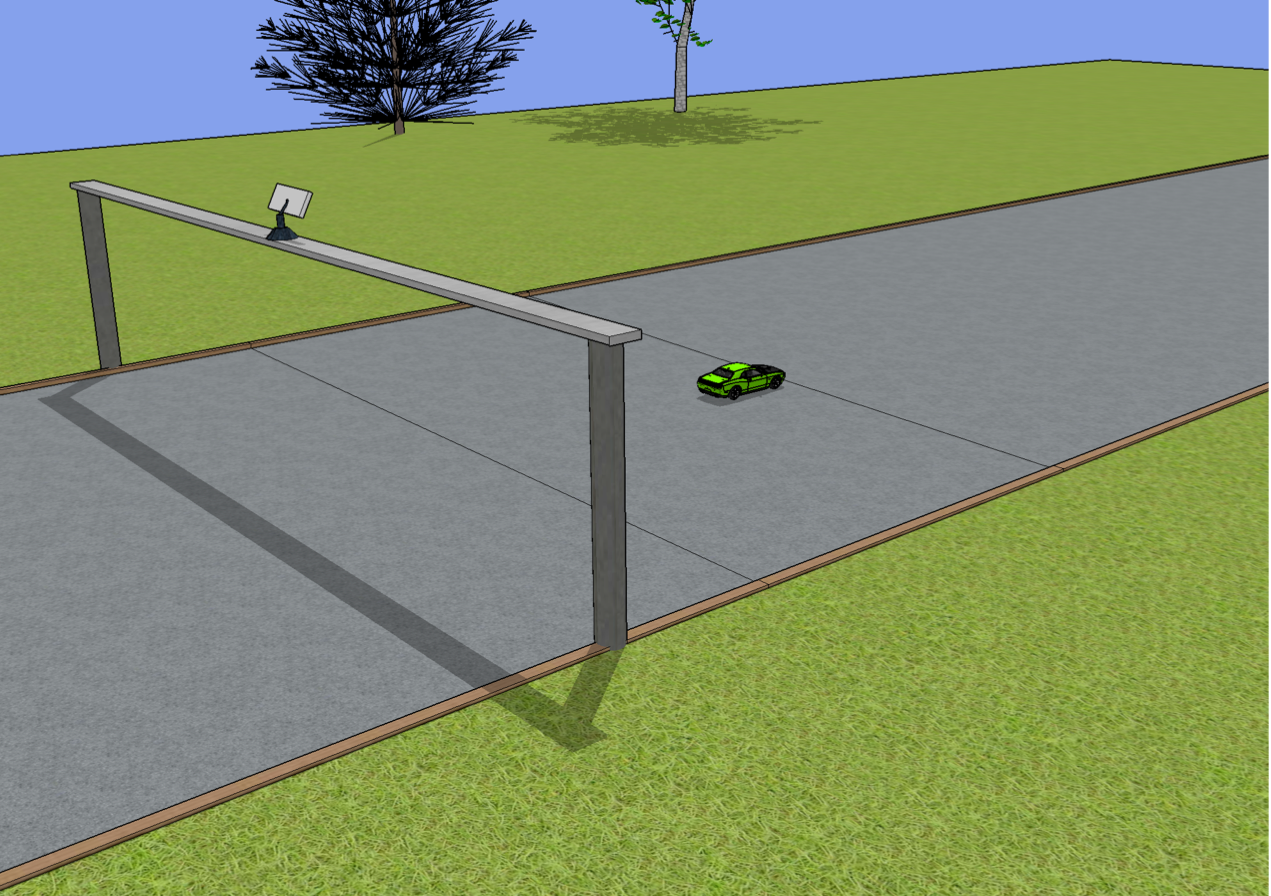
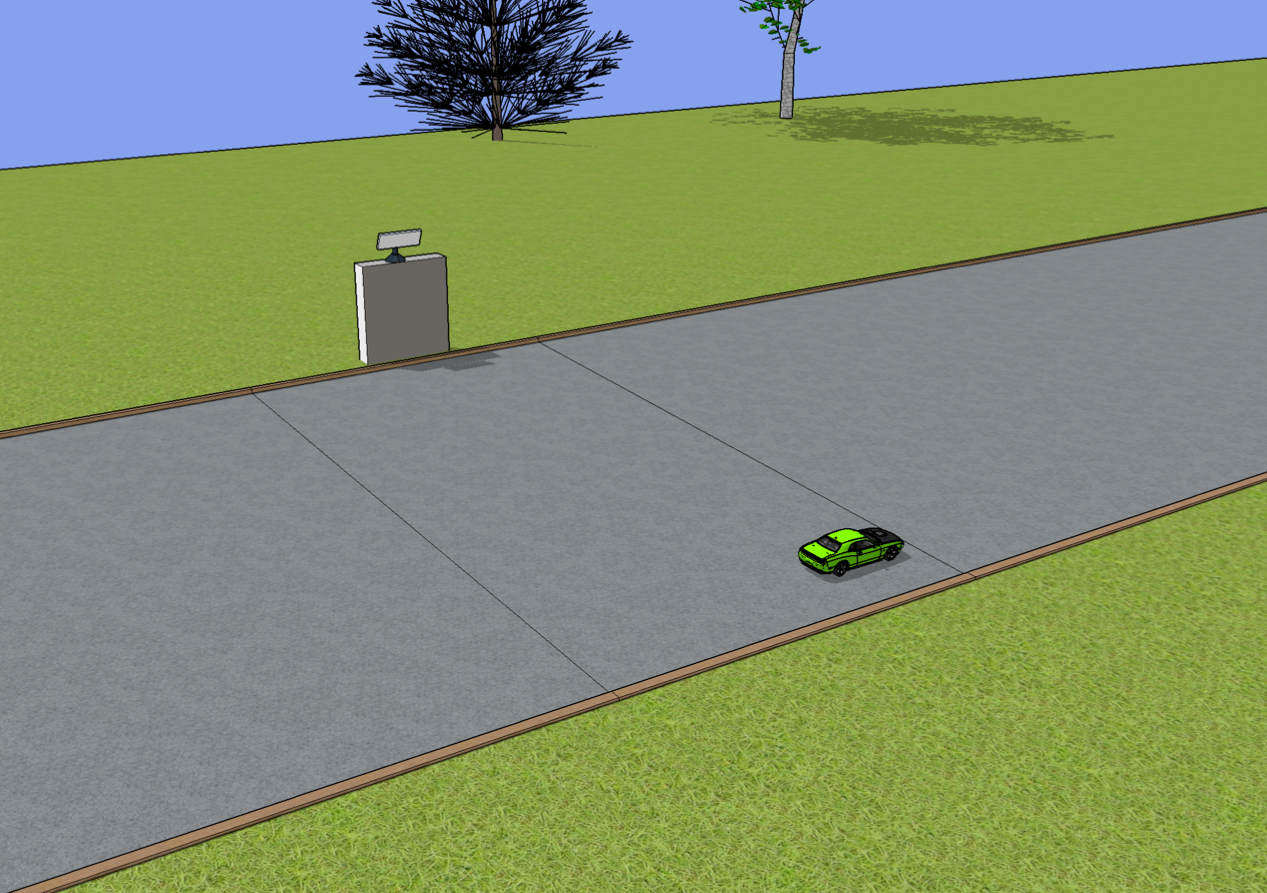
First thing to do is to place the iOS device at the place in the track where you want to have the start/finish line. Ideally the iOS device should be mounted above the track with the camera pointing obliquely to the track. It is recommended to use a mobile holder.
Next images should the optimal locations for the iOS device:
Indoor/outdoor tracks:
Optimal Position 1
Optimal Position 2
Slot Racing:
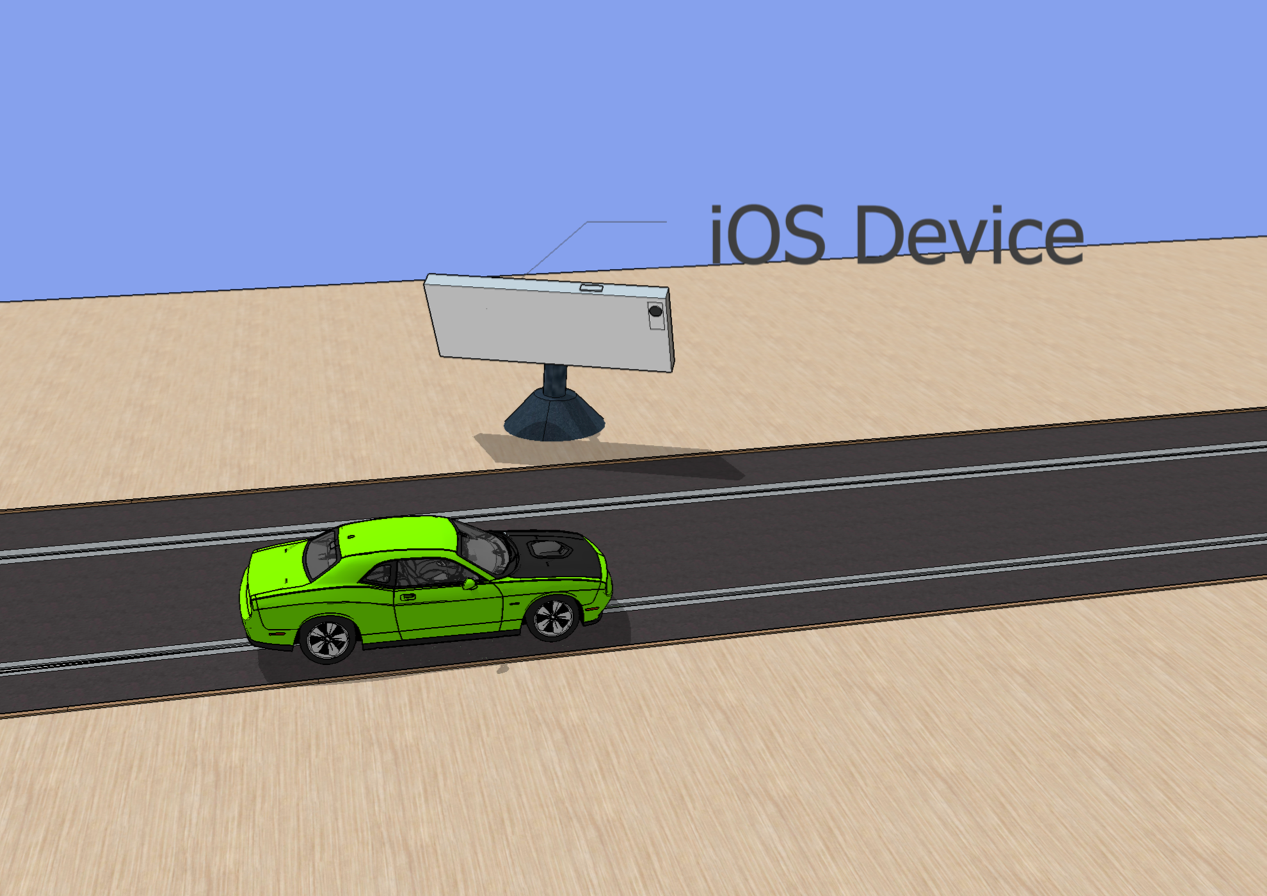
The next considerations must be taken into account in order to get a successful timing session:
- The camera should cover only the track as much as possible
- The camera should cover the whole width of the track
- You should avoid placing the camera focusing a scene with lot of moving parts
- You should avoid placing the camera facing the sunlights
Once the mount point is ok, you should place the car in the track that can be seen in the camera view and place it as far as possible from the mount point.
Then you should pick the color of the car that can be seen with the camera view inside the Configuration view by tapping and dragging the finger over the camera view. Once you have chosen the right color of the car, you need to move to the Threshold view.
There you can basically setup to things:
- Color Tolerance: this controls how accurate the color needs to be in order to consider it as a match.
- Trigger Value: this controls how much color must be detected on the screen in order to fire the
detected carevent.
The procedure to set this up is first to tweak the Color Tolerance up to the point you clearly see only the part of the car colored with the chosen color. No less, no more.
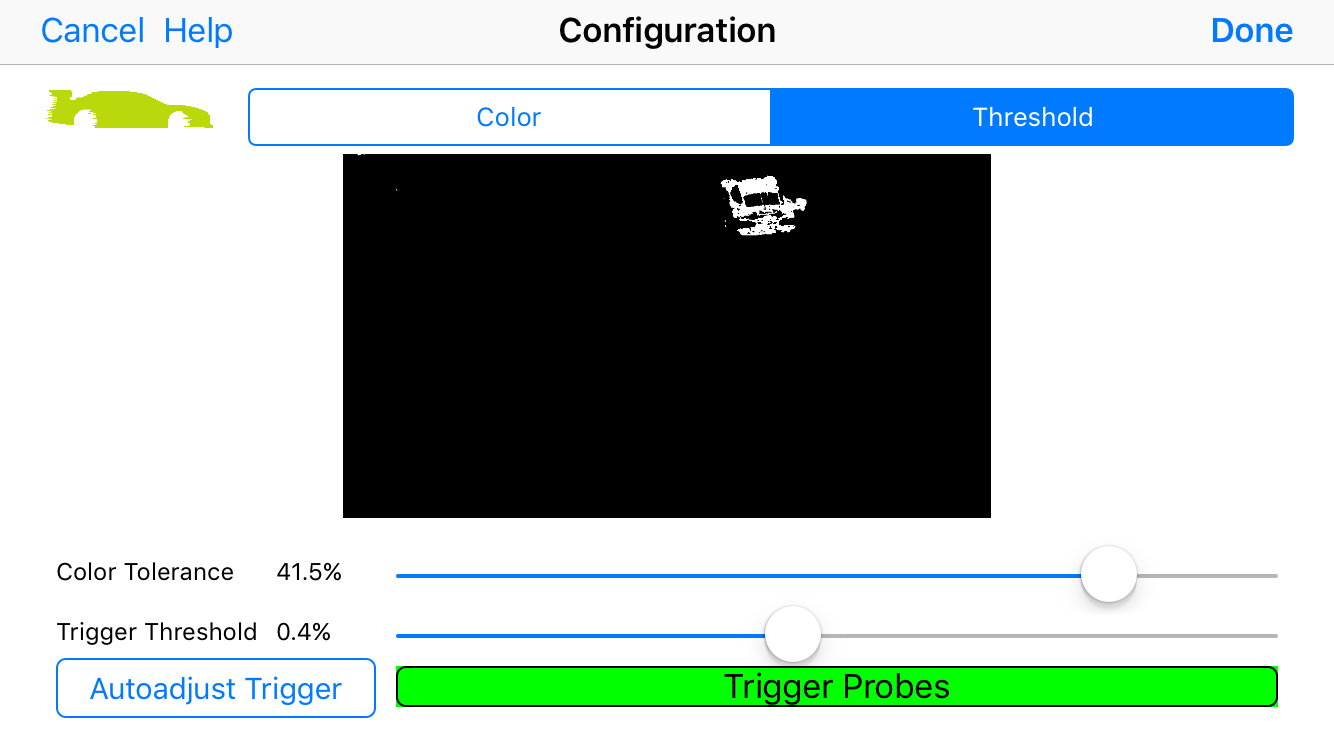
Then, press the button Autoadjust that will calculate the appropriate Trigger Value to use, but you can also tweak it manually if desired. This view shows a Trigger Probes which is green-colored when the car is detected and it is no colored if the car is not detected. So you can tweak that settings in order to control the sensor. You should avoid to set the Trigger Value too high as it then will not detect anything. You should also avoid to set that setting to low because it would yield false detections. So it is recommended initially to start with the value adjusted after pressing the Autoadjust button.
Summary:
- Select iOS device mount point
- Mount the iOS device
- Go to car
Configurationview - Put the car inside the camera view but as far as possible of the iOS device
- Pick up the car color
- Go to
Threshold - Adjust Color Tolerance as needed to only see as white the parts of the car with the selected color
- Press
Autoadjustbutton. TheTrigger Probesindicator must be then green-colored. - Press
Save
Timing Session
Once you have configured and selected a track and some cars, you can start a Timing Session. Pressing the Start button will start a timing session. The navigation bar goes to green once the session has started. In order to stop it, press the Stop button. It is recommended to lower the iOS device brightness during timing session in order to help draining the battery.